Login and Signup API Guide
Logging or signing up a user takes more than just designing a login page. There are many edge cases to consider, such as enforcing MFA, if the user is missing required User Properties, or if the user needs to confirm their email address. This guide will help you understand how to use the APIs provided by PropelAuth to handle these cases.
Building Required Pages
The first step is to build the necessary pages to handle the full login and signup flow. This library provides all the APIs you'll need to get started, but for your convenience, here are some common pages you may need to build and the APIs to help you do so.
| Page Type | APIs |
|---|---|
| Login Page | emailPasswordLogin, passwordlessLogin, loginViaSamlForOrg, loginWithSocialProvider |
| Signup Page | signup, passwordlessLogin, loginViaSamlForOrg, loginWithSocialProvider |
| Request Reset Password Page | sendForgotPasswordEmail |
| Update Password Page | updatePassword |
| Confirm Email Page | resendEmailConfirmation |
| Update User Properties Page | updateUserMetadata |
| Join Org Page | fetchJoinableOrgs, joinOrg |
| Enroll In 2FA Page | fetchMfaStatusWithNewSecret, enableMfa |
| Verify 2FA Page | verifyMfaForLogin, verifyMfaBackupCodeForLogin |
Once you have built these pages, how do you know which page to show the user? This is where the concept of Login State comes in.
Login State
Our Login and Signup APIs were built from the ground up around the concept of a Login State. This state is a way for you to know what the user needs to do next to complete the login process. For example, if the user needs to log in, you can show them a login form. If the user needs to confirm their email, you can show them a message to check their email.
But how do you know what the user's Login State is? You can use the fetchLoginState API which will return a LoginState enum that you can use to determine what page to show the user.
Here is each possible Login State the user can be in:
LOGIN_REQUIRED- The user needs to log in.TWO_FACTOR_REQUIRED- The user has enrolled in 2FA but needs to enter their code.TWO_FACTOR_ENROLLMENT_REQUIRED- The user needs to enroll in 2FA because an organization they are in requires itEMAIL_NOT_CONFIRMED_YET- A confirmation email has been sent to the user and they need to accept it.USER_MISSING_REQUIRED_PROPERTIES- The user is missing required User Properties such as username, first name, last name, etc.USER_MUST_BE_IN_AT_LEAST_ONE_ORG- You have the "User must be in at least one org" option enabled and the user does not belong to an organization. They can either join an organization or create a new one.UPDATE_PASSWORD_REQUIRED- The user needs to update their password.LOGGED_IN- The user has completed the login process.
Some Login States may not be applicable based on your configuration. For example, if you do not require users to
confirm their email address, you can ignore the ConfirmEmailRequired case. If you don't require users to be in an
organization, you can ignore the UserMustBeInAtLeastOneOrg case.
Retrieving and Managing Login State
So far we've covered what Login State is and how to retrieve it. But how can we keep the Login State up to date while effectively redirecting your user from page to page? There are a few ways to do this, but we recommend using React Context to pass the Login State easily throughout your application.
Here is an example of how you can use React Context to pass the Login State to your components:
src/contexts/LoginContext.tsx
import { useAuthFrontendApis } from '@propelauth/frontend-apis-react'
import { LoginState } from '@propelauth/frontend-apis'
import { createContext, useCallback, useEffect, useState } from 'react'

type Loading = {
    isLoading: true
    error: never
    loginState: never
}

type Error = {
    isLoading: false
    error: string
    loginState: never
}

type Success = {
    isLoading: false
    error: never
    loginState: LoginState
}

export type LoginStateContext = {
    getLoginState: () => Promise<void>
    setLoginState: (loginState: LoginState) => void
} & (Loading | Error | Success)

export const LoginContext = createContext<LoginStateContext | undefined>(undefined)

export const LoginContextProvider = ({ children }: { children: React.ReactNode }) => {
    const [loginState, setLoginState] = useState<LoginState>()
    const [isLoading, setIsLoading] = useState(true)
    const [error, setError] = useState<string>()

    const { fetchLoginState } = useAuthFrontendApis()

    const getLoginState = useCallback(async () => {
        setIsLoading(true)
        setError(undefined)
        const response = await fetchLoginState()
        response.handle({
            success({ login_state: loginState }) {
                setLoginState(loginState)
            },
            unexpectedOrUnhandled(error) {
                console.error('Unexpected or unhandled', error.user_facing_error)
                setError(error.user_facing_error)
            },
        })
        setIsLoading(false)
    }, [])

    // On initial render, fetch the login state.
    useEffect(() => {
        getLoginState()
    }, [getLoginState])

    let value: LoginStateContext
    if (isLoading) {
        value = {
            isLoading: true,
            error: undefined as never,
            loginState: undefined as never,
            getLoginState: getLoginState,
            setLoginState: setLoginState,
        }
    } else if (error || !loginState) {
        value = {
            isLoading: false,
            error: error ?? 'An error occurred when fetching the login state.',
            loginState: undefined as never,
            getLoginState: getLoginState,
            setLoginState: setLoginState,
        }
    } else {
        value = {
            isLoading: false,
            error: undefined as never,
            loginState,
            getLoginState: getLoginState,
            setLoginState: setLoginState,
        }
    }

    return <LoginContext.Provider value={value}>{children}</LoginContext.Provider>
}
You can then create a React hook to refetch the Login State whenever you need it:
src/hooks/useLoginContext.ts
import { useContext } from 'react'
import { LoginContext, LoginStateContext } from '@/contexts/LoginContext'

export const useLoginContext = (): LoginStateContext => {
    const context = useContext(LoginContext)
    if (!context) {
        throw new Error('useLoginContext must be used within a LoginContextProvider')
    }
    return context
}
This hook will allow us to keep the Login State up to date. For example, if the user successfully logs in using emailPasswordLogin, we can refetch the Login State to see if they need to complete any additional steps.
src/pages/LoginPage.tsx
import { useAuthFrontendApis } from '@propelauth/frontend-apis-react'
import { useLoginContext } from '@/hooks/useLoginContext'

const LoginPage = () => {
    const { emailPasswordLogin } = useAuthFrontendApis()
    const { setLoginState } = useLoginContext()

    const handleLogin = async () => {
        const response = await emailPasswordLogin({
            email: 'test@example.com',
            password: 'password',
        })
        response.handle({
            async success(data) {
                setLoginState(data.login_state)
            },
            // handle error cases
            badRequest(error) {
                // setFormErrors(error.user_facing_errors)
            }
        })
    }

    // render login form
}
Redirecting Users Based on Login State
Now that we have our React Context built and a way to keep the Login State up to date, let's build a state manager that will check the Login State and redirect the user accordingly.
src/components/LoginStateManager.tsx
import { LoginState } from '@propelauth/frontend-apis'
import { useLoginContext } from '@/hooks/useLoginContext'
import { LoginContextProvider } from '@/contexts/LoginContext'

const LoginElementByState = () => {
    const { loginState, isLoading, error } = useLoginContext()

    if (isLoading) {
        return <div>Loading...</div>
    } else if (error || !loginState) {
        return <div>{error ?? "An unexpected error has occurred"}</div>
    }

    switch (loginState) {
        case LoginState.LOGIN_REQUIRED:
            return // login or signup page
        case LoginState.USER_MISSING_REQUIRED_PROPERTIES:
            return // update user properties page
        case LoginState.EMAIL_NOT_CONFIRMED_YET:
            return // email confirmation page
        case LoginState.UPDATE_PASSWORD_REQUIRED:
            return // update password page
        case LoginState.USER_MUST_BE_IN_AT_LEAST_ONE_ORG:
            return // create or join org page
        case LoginState.TWO_FACTOR_ENROLLMENT_REQUIRED:
            return // enable 2FA page
        case LoginState.TWO_FACTOR_REQUIRED:
            return // 2FA verification page
        case LoginState.LOGGED_IN:
            window.location.reload()
            return null
    }
}

const LoginStateManager = () => {
    return <LoginContextProvider>
        <LoginElementByState />
    </LoginContextProvider>
}

export default LoginStateManager
Now you can use the LoginStateManager component to render a Component representing the next step the user take based on their Login State. Below, we'll use RequiredAuthProvider's displayIfLoggedOut property to render this component if the user is not logged in.
src/main.tsx
import LoginStateManager from '@/components/LoginStateManager'
import { RequiredAuthProvider } from '@propelauth/react'

createRoot(document.getElementById('root')!).render(
    <RequiredAuthProvider
        authUrl={AUTH_URL}
        displayIfLoggedOut={<LoginStateManager />}
    >
        <App />
    </RequiredAuthProvider>,
)
If the user has a Login State of anything besides LOGGED_IN, the component within the displayIfLoggedOut property will rendered. If the user has logged in successfully and has a Login State of LOGGED_IN, the <App /> will be rendered instead.
Signup vs Login
There are cases where you may want to redirect users directly to your signup page instead of your login page. One example of this is when users are invited to join an organization in your app - they'll receive an email which accepts the invite and redirects them to signup. But based on what we've covered so far, how can we do so?
One option is to create /login and /signup routes, but in this example let's instead use query parameters. When a user navigates to your app and is unauthenticated, a query parameter of signup=true will render the signup page over the login page. Let's create a component called LoginAndSignup to handle this for us.
src/components/LoginAndSignup.tsx
export default function LoginAndSignup() {
    const params = new URLSearchParams(window.location.search)
    const defaultToSignup = params.get('signup') === 'true'
    const [displaySignup, setDisplaySignup] = useState(defaultToSignup)

    function switchPage(page: 'signup' | 'login') {
        const params = new URLSearchParams(window.location.search)
        params.set('signup', page === 'signup' ? 'true' : 'null')
        window.history.replaceState({}, '', `${window.location.pathname}${params.toString() ? '?' + params : ''}`)
        setDisplaySignup(page === 'signup')
    }

    if (displaySignup) {
        return (
            <>
                <h2>Signup</h2>
                <EmailPasswordSignup />
                <button onClick={() => switchPage('login')}>Login</button>
            </>
        )
    } else {
        return (
            <>
                <h2>Login</h2>
                <EmailPasswordLogin />
                <button onClick={() => switchPage('signup')}>Signup</button>
            </>
        )
    }
}
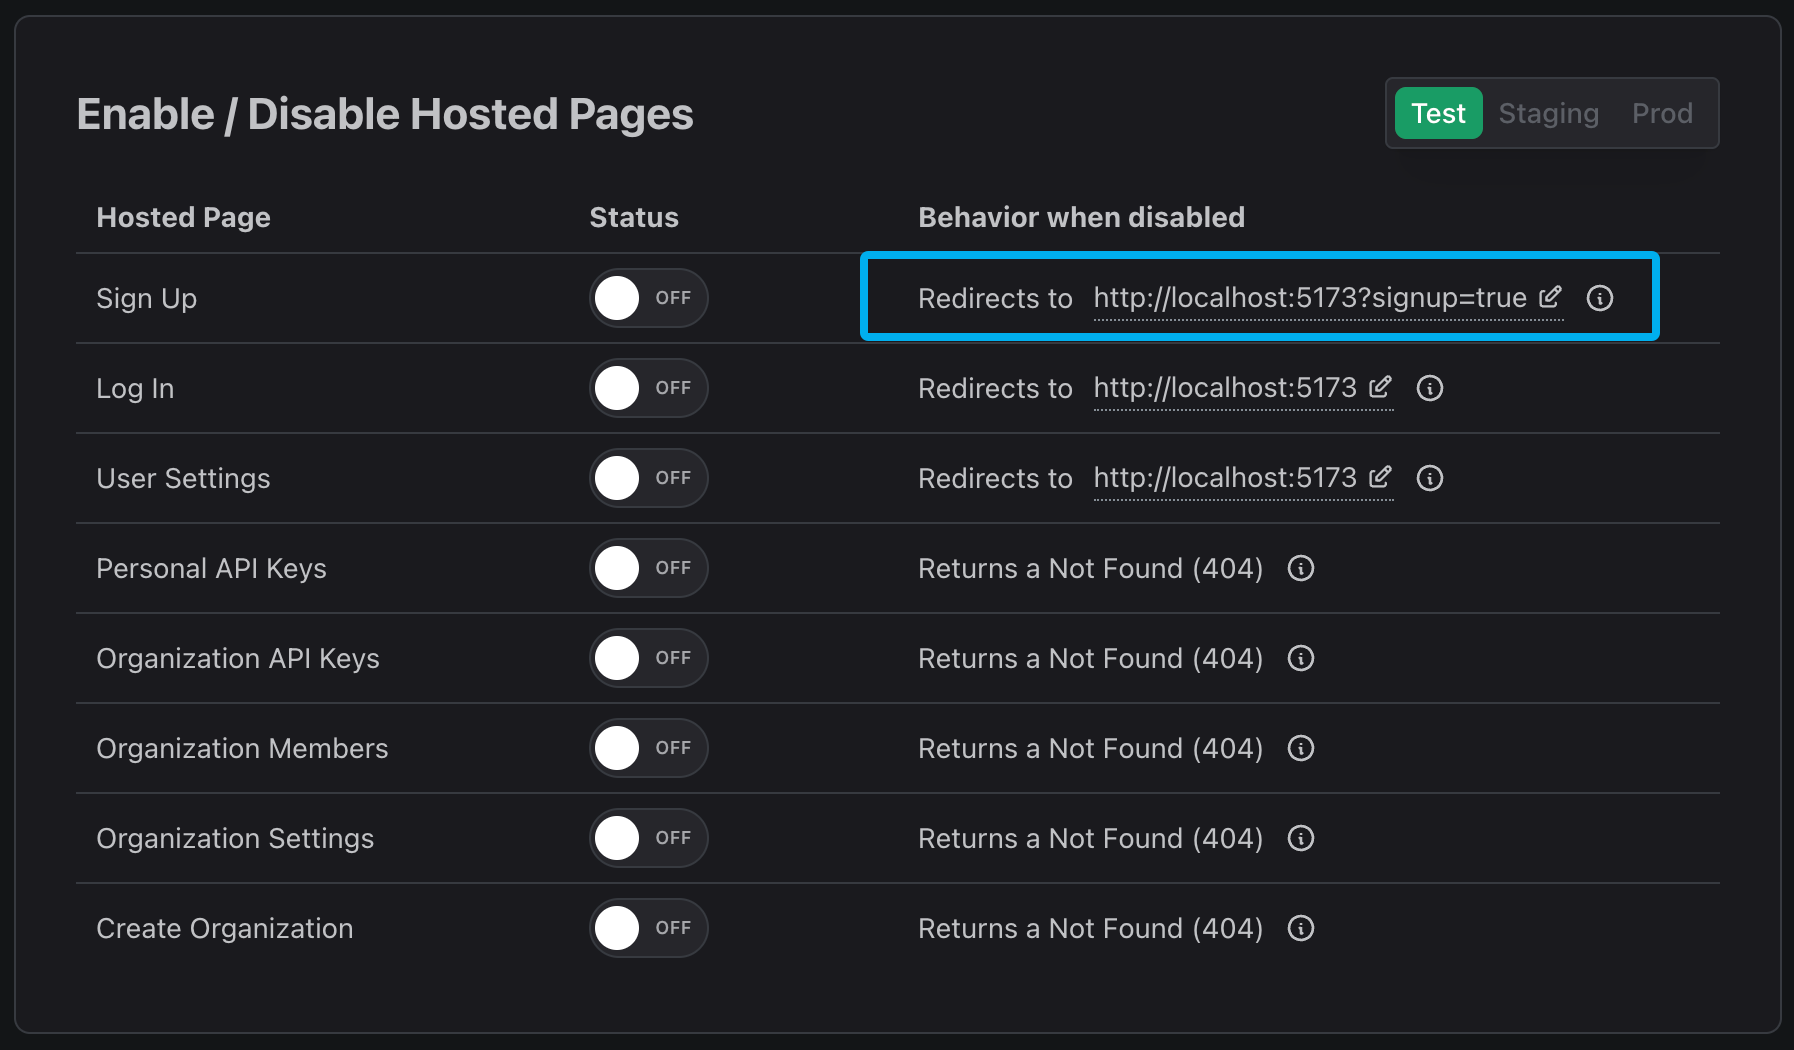
Now that we redirect users based on the signup query parameter, let's update the Disable Hosted Pages menu to ensure users are redirected to the signup page from the transactional emails.
Next Steps
Have any feedback or questions? Feel free to reach out to us at support@propelauth.com